Insights & Risk Monitoring
-
- Identity Provider (IdP): The Foundation of Sastrify Insights
- Uncover SaaS Usage and Shadow IT with Identity Provider (IdP) Discovery
- Integrating HRIS to Enrich Identities & Insights
- Admin Guide: Deploying the Sastrify Chrome Extension
- Admin Guide: Deploying the Sastrify Microsoft Edge Extension
- Manual Installation Guide: Sastrify Chrome Browser Extension
- Manual Installation Guide: Sastrify Edge Browser Extension
- Setting renewal dates & reminders
- Assigning & Modifying Subscription Owners
- Uploading & Managing Your SaaS Documents in Sastrify
- Sastrify App Support: Get Help & Give Feedback
- Sastrify's commitment to security and privacy standards
- Integrating HRIS to Enrich Identities & Insights
-
- Capturing Subscription Details with Contract AI
- Adding a New Subscription Manually
- Slack Integration: Bringing Sastrify into Your Internal Communication
- How to bulk upload your invoices
- Automating Document Uploads via Email Forwarding
- Managing Your Notification Preferences
- Tools and Spend Importer: Bulk Upload & Visualization
- Tool Matching: Aligning ERP Data with Your Inventory
- Managing Collaboration with Custom Tasks
- Task Automation: Standardizing and Automating Routine Actions
-
- Workflows: Automate procurement processes with consistency
- Requests: Streamline procurement process and internal approval
- Get Procurement Support for New Purchases and Renewals
- How to submit and track Procurement Requests via Jira Integration
- Scope of service: Custom benchmarking & contract review
- Scope of service: Negotiation & renewal support
- Scope of service: Custom SaaS Optimization Advisory
- Purchase your SaaS through the SastriMarket
-
- Connecting Your ERP & Accounting Software
- Spend Import: Validate and fine-tune your imported spend data
- Export spend data from Candis to Sastrify
- Export spend data from Spendesk to Sastrify
- Export spend data from Pleo to Sastrify
- Export spend data from Moss to Sastrify
- Export spend data from DATEV to Sastrify
- Export spend data from Ramp to Sastrify
-
- Configuring Authentication & Access
- User Management: Managing Users and Platform Roles
- Configuring Microsoft SSO Authentication
- Configuring Okta SSO Authentication
- Configuring JumpCloud SSO Authentication
- Configuring Cisco Duo SSO Authentication
- Configuring Cloudflare SSO Authentication
- Configuring OneLogin SSO Authentication
- Having trouble logging in?
- Understanding user roles and permissions
-
- Okta M2M Integration Guide
- Accounting & ERP: Connecting NetSuite to Sastrify
- Accounting & ERP: How to connect Quickbooks
- Accounting & ERP: How to connect Microsoft Dynamics 365
- Accounting & ERP: How to connect Workday ERP
- Accounting & ERP: How to integrate Pleo with Sastrify
- HRIS: Connecting Officient to Sastrify
-
- ERP & Accounting Integration FAQs
- SSO / IDP Discovery Integration FAQs
- Browser Extension FAQs
- HRIS Integration FAQs
- Usage Analytics FAQs
- Contract AI & Subscription Details FAQs
- Tools and Spend Importer FAQs
- Invoices FAQs
- Achieved Savings FAQs
- Form component guide for Sastrify form builder
- What is SaaS and Sastrify's scope of work?
- Who receives the renewal alerts or reminders?
- How does Sastrify work with currencies?
- Is the spend data from accounting export always up-to-date?
- How to work with benchmark prices
- When and how to involve Sastrify in a contract evaluation or negotiation?
- How does Sastrify interact with SaaS vendors?
- How do you handle confidentiality clauses in vendor contracts?
- Why is contract data essential for benchmarking and negotiation support?
Detecting and Managing Assets with Shadow IT Radar Print
Modified on: Fri, 13 Feb, 2026 at 12:13 PM
Shadow IT Radar doesn’t just detect tools—it helps you govern them. By combining automated AI-driven risk scoring with real-time usage metrics, it enables you to shift from reactive discovery to proactive compliance management.
Sastrify’s Shadow IT Radar empowers IT and compliance teams to detect, assess, and manage both authorized and potentially unauthorized applications. Leveraging your Identity Provider (IdP) connection as the foundational data source—enhanced by insights from the browser extension—it identifies applications in use and potential shadow assets, assigns dynamic risk scores, and delivers clear, actionable next steps.
With full visibility and guided actions such as approving, sanctioning, or contacting users, you can reduce compliance risks, strengthen security, and streamline operations across your organization.
IN THIS ARTICLE
- Prerequisites for Shadow IT Radar
- The Four Building Blocks of Radar
- Overview Tab: The Discovery Zone
- Sanctioned Tab: The Compliance Zone
- Identities Tab: The Accountability Zone
- Ignored Tab: The Maintenance Zone
Prerequisites for Shadow IT Radar
To ensure the Shadow IT Radar is populated with accurate data, the Identity Provider (IdP) must be active. This is your Single Source of Truth. IdP provides visibility into all applications accessed and managed via your company IdP.
- For detailed instructions, refer to this guide on connecting your Identity Provider (IdP).
As a powerful complementary component, Browser Extension—deployed via admin or manual installation—capture usage metrics from company-managed browser profiles, providing deeper insights into software activity.
- Google Chrome: Admin Installation Guide | Manual Installation Guide
- Microsoft Edge: Admin Installation Guide | Manual Installation Guide
The Four Building Blocks of Radar
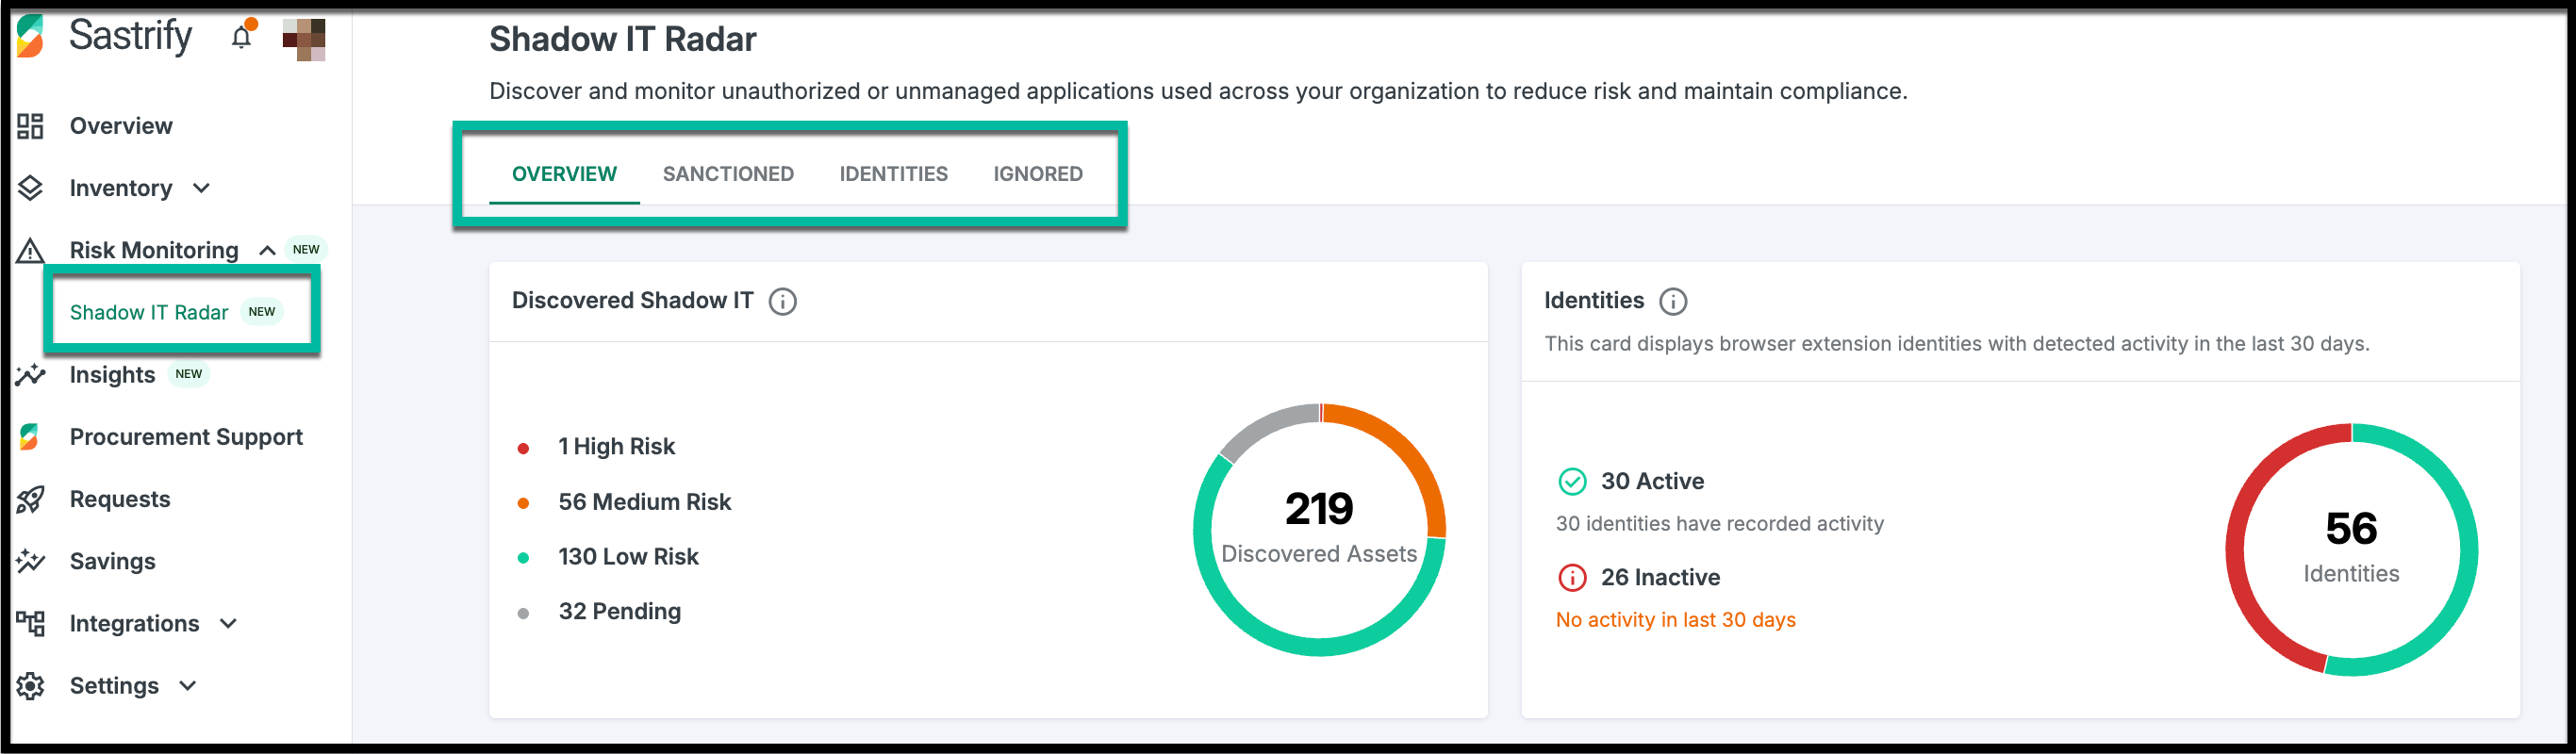
Navigate to Risk Monitoring > Shadow IT Radar to access the four tabs that support your asset evaluation process:
Overview: Track all discovered assets, filter by risk score or source, take actions such as approval or sanction, and summarize asset findings and user monitoring by risk and monitoring status.
Sanctioned: View sanctioned tools and send reminders to identities/users to ensure compliance.
Identities: See a breakdown of identities from your IdP, including the assets they use, a summary of monitored vs. unmonitored employees, and how many are using shadow or sanctioned tools.
Ignored: Not every discovery requires action. In addition to approving or sanctioning tools, you can mark irrelevant assets as ignored.
Overview Tab: The Discovery Zone
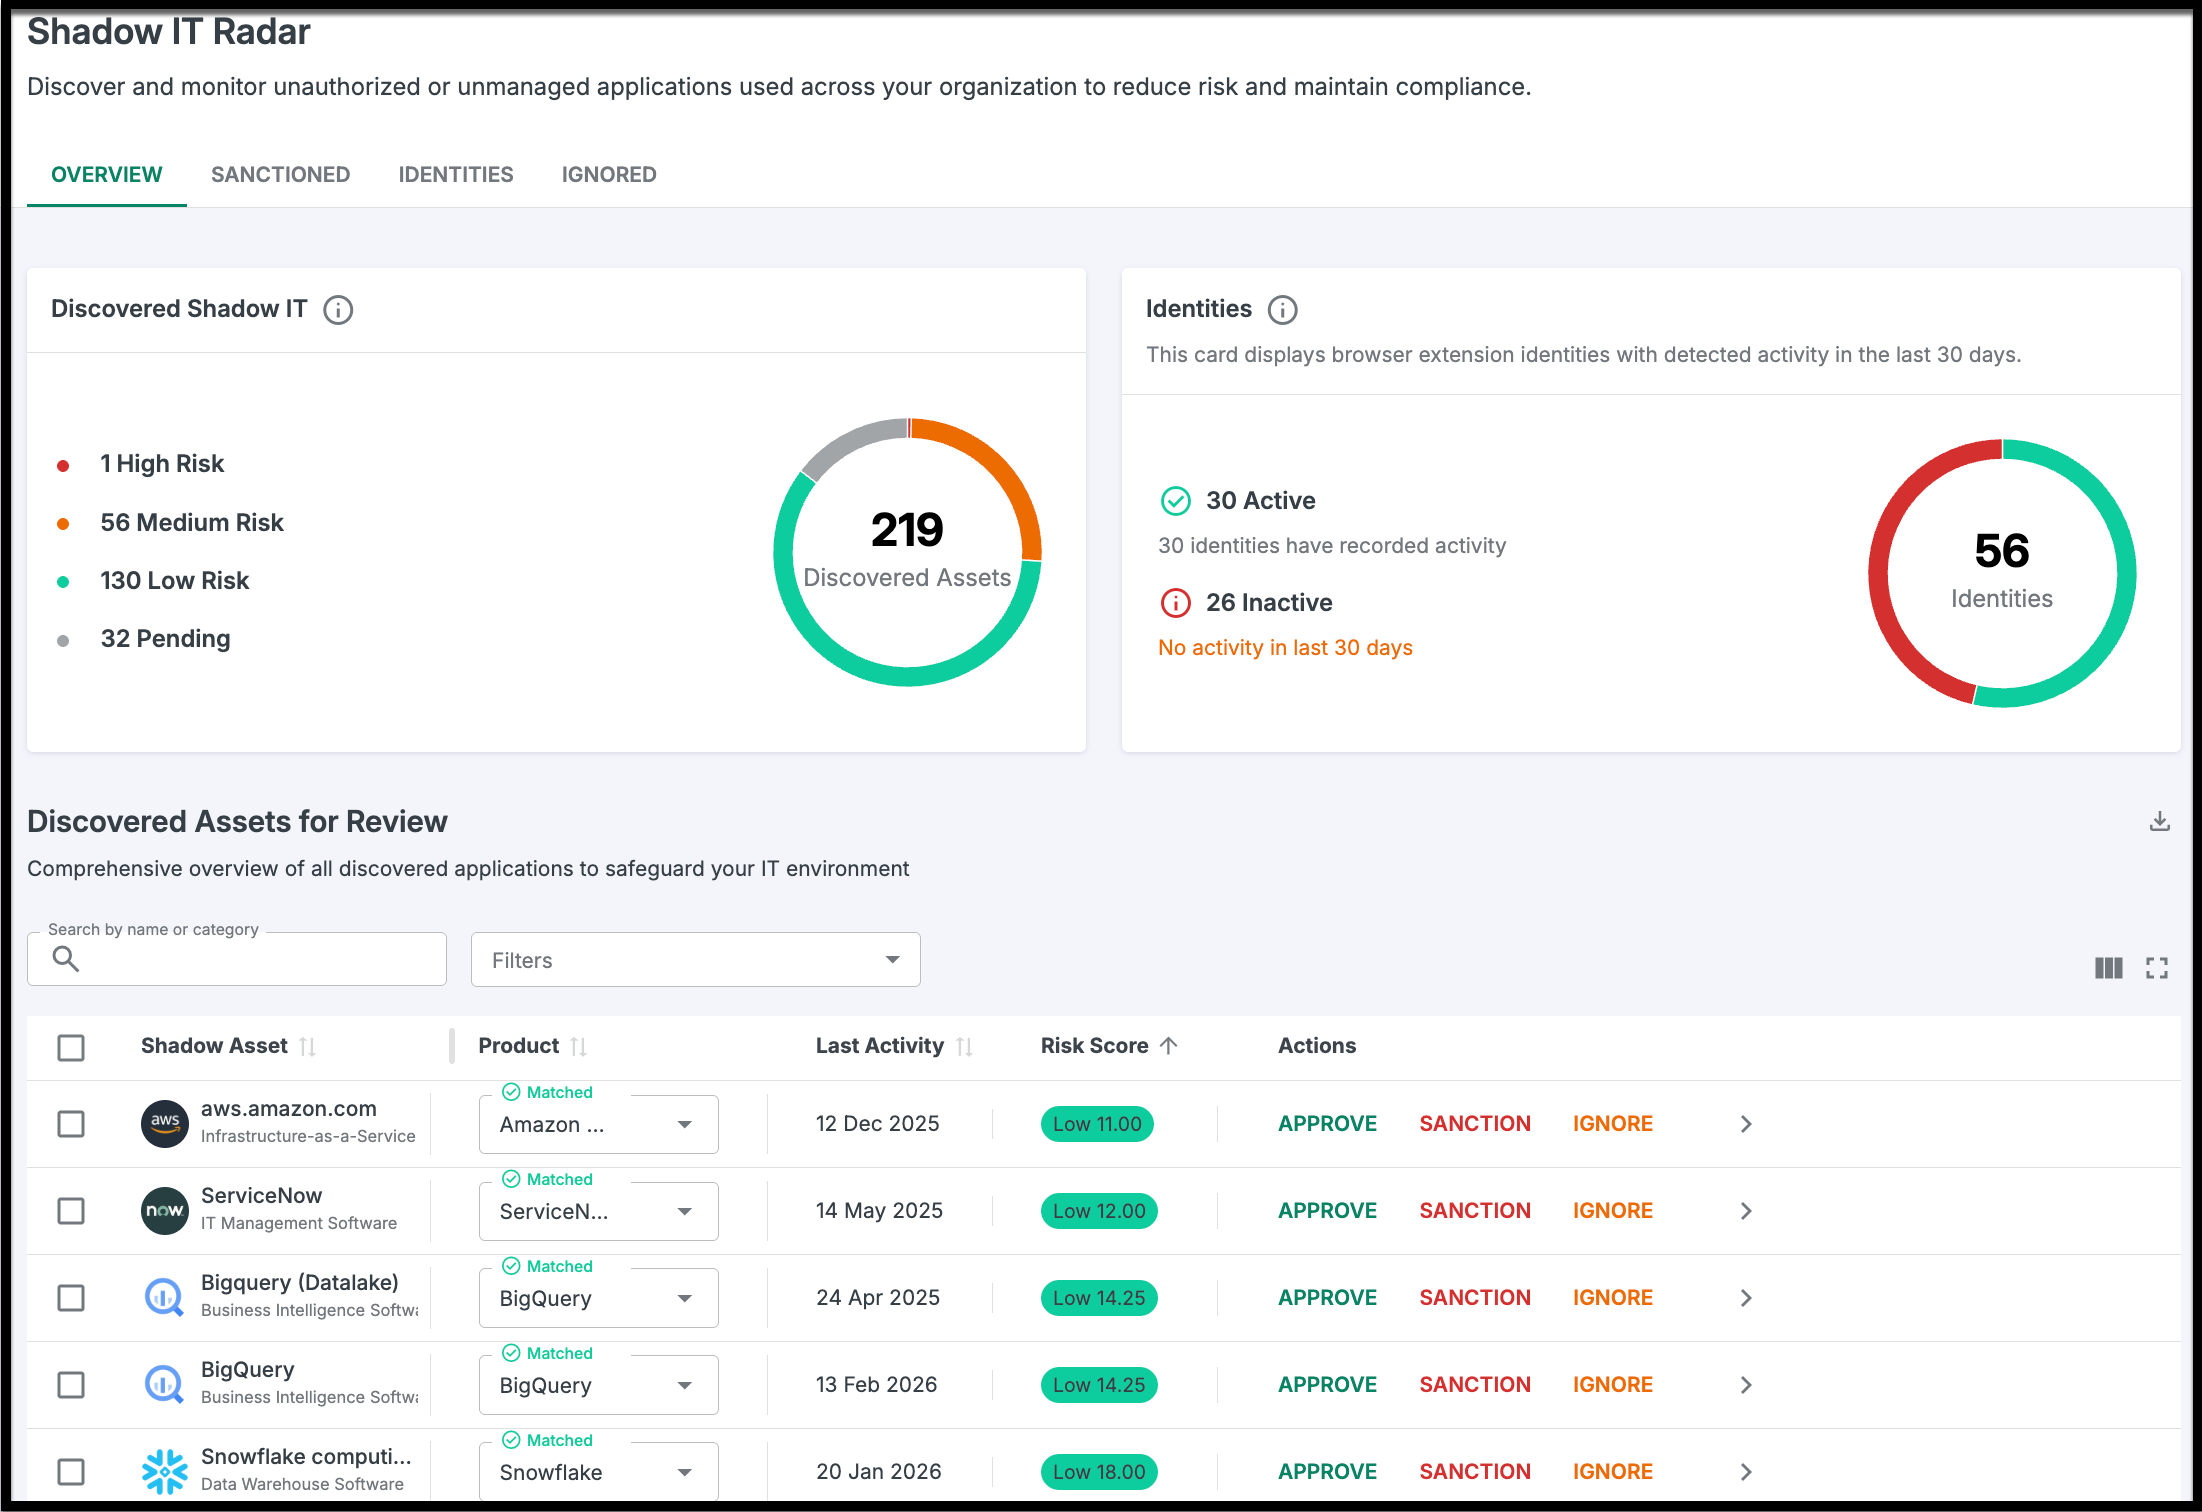
The Overview tab is your starting point for every newly detected asset. Here, Sastrify’s matching algorithm automatically cross-references and matched discoveries against an extensive product catalog to ensure accurate naming and mapping.
Manual Matching: Any unmatched assets can be manually matched to certain products using the fields on each line item. Matched assets can also be re-matched to new products, giving you full control over shadow IT discoveries.
You can take actions directly from this page:
Approve: Moves the matched assets as products to Inventory > Suppliers & Products.
Sanction: Moves the assets to the Sanctioned tab.
Ignore: Moves the assets to the Ignored tab.
Pro Tip: Actions can be performed individually or in bulk by selecting multiple assets and clicking the corresponding button in the lower-right corner of the page.Sanctioned Tab: The Compliance Zone
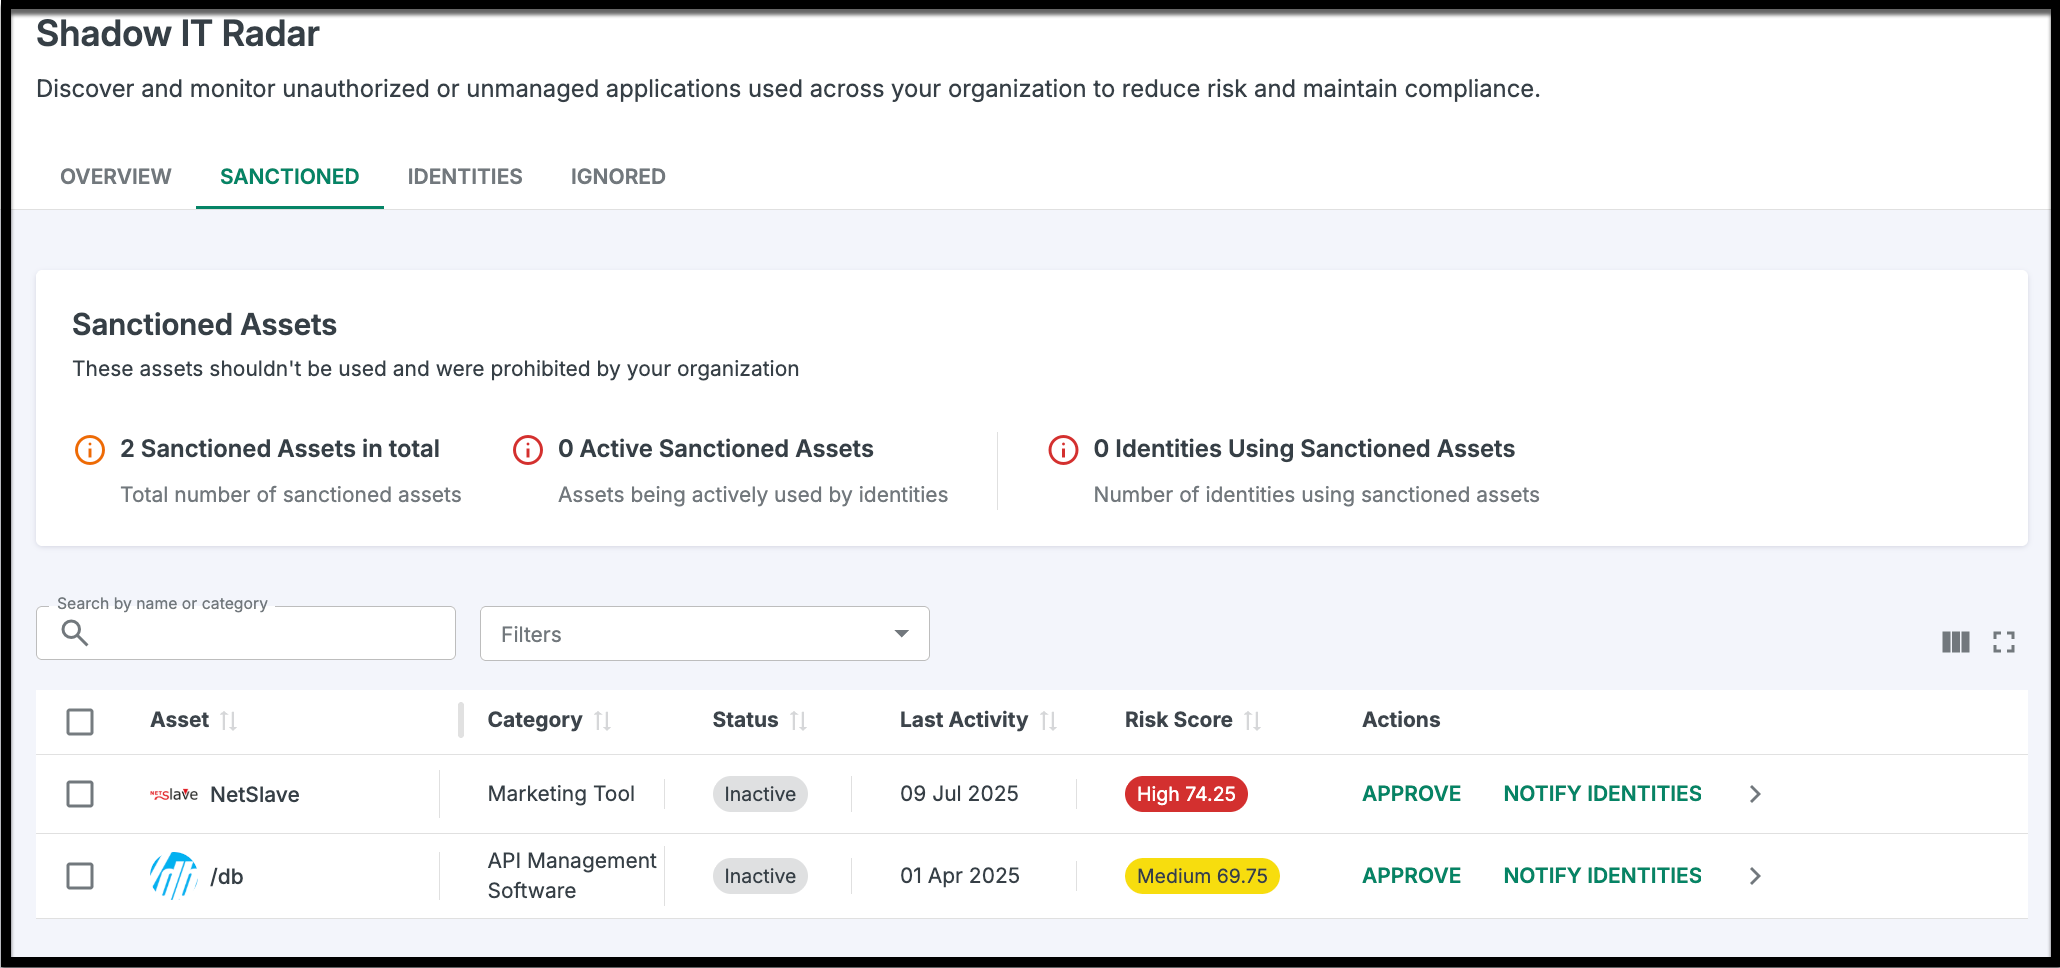
This tab houses assets that have been officially sanctioned for company use.
Notify Identities: Click "Notify Identities" to send an automated email reminder to employees, instructing them to discontinue use of a specific tool.
Re-Evaluate: If a sanctioned tool is later cleared for use, you can Approve it directly from here to move it to your Inventory.
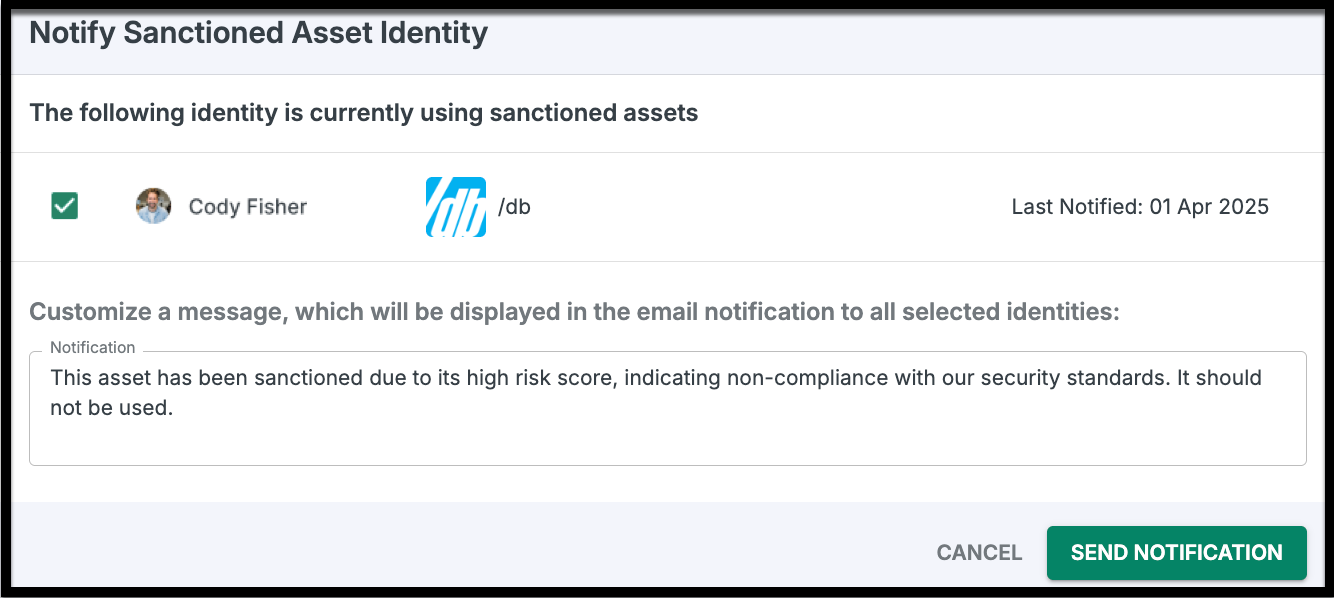
Identities Tab: The Accountability Zone
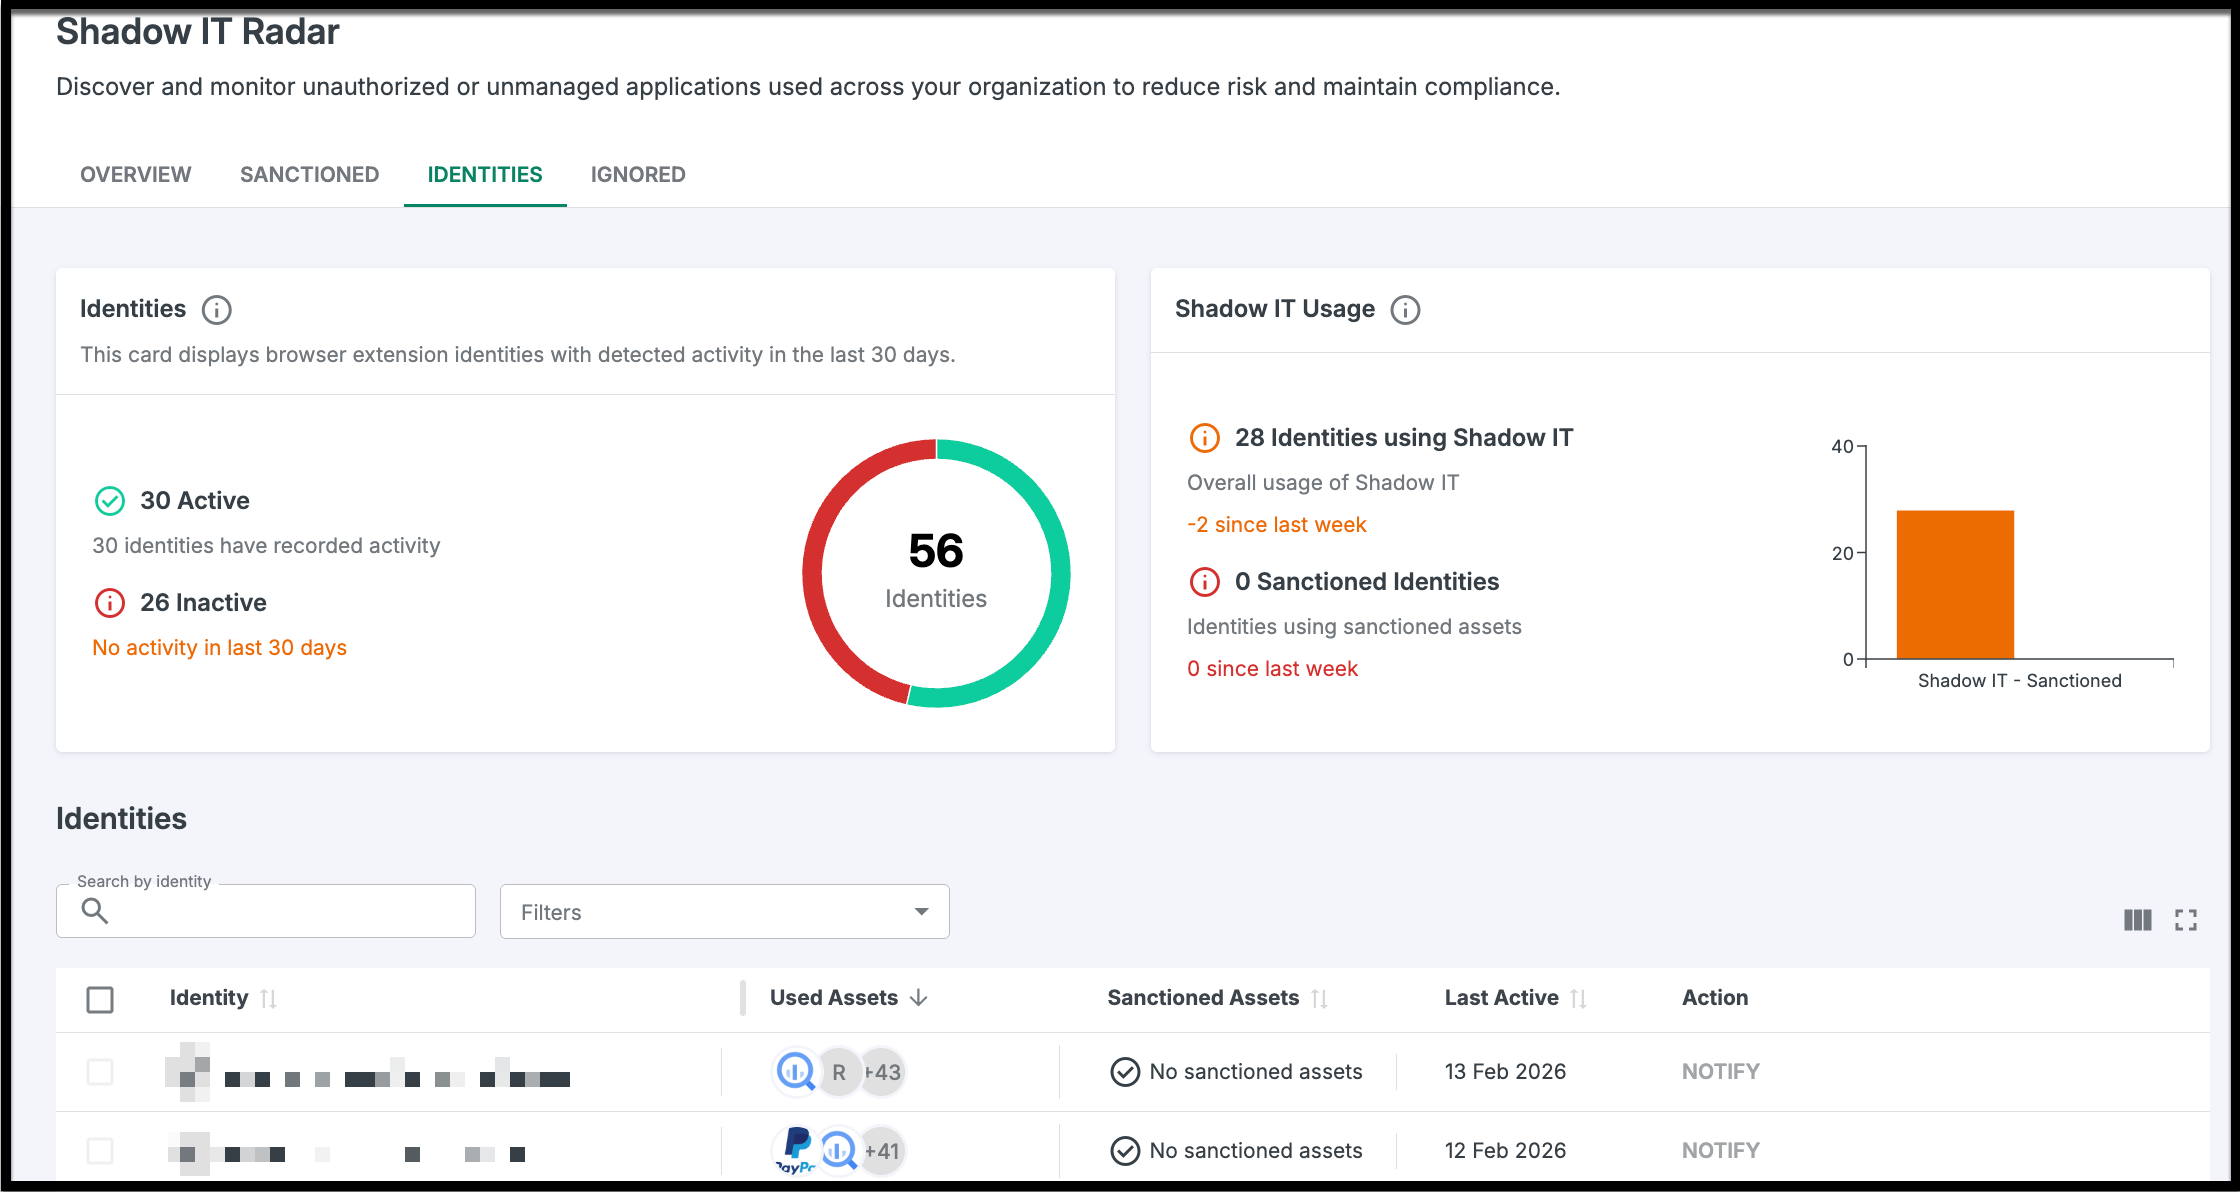
The Identities tab shifts the focus from software to people. It provides a deep dive into the human element of your SaaS risk, mapping identities from your IdP to the specific tools they are using.
Identity Breakdown: See exactly which assets are associated with specific identities.
- Direct Contact: Use the notification feature to send email reminders to employees, instructing them to follow compliance steps or discontinue use of specific assets.
The page shows how many identities are active versus inactive over the past 30 days, based on the following usage thresholds: ≥20 clicks, ≥15 keystrokes, any file upload, or session longer than 3 minutes. User activity metrics track only the frequency or occurrence of these actions—they do not capture the actual keys pressed or the contents of uploaded files.
Ignored Tab: The Maintenance Zone
Not every discovery is a threat. Use this tab to store "noise" or irrelevant items that don't require action but should be kept out of your main Overview.
Clean Workspace: Keep your Overview tab focused on actionable items.
Restore: If an ignored tool suddenly becomes relevant, you can move it back to Approve or Sanction at any time
Did you find it helpful? Yes No
Send feedback